A meeting type in Kronologic is a highly repeatable meeting that once defined can be used at scale to initialize multiple meeting instances at a time.
Having meeting types defined not only eases the scheduling process but also brings the calendar first approach to life. Meeting types in Kronologic automate, personalize and standardize meeting invitations while managing the distribution of leads across team members at the same time.
Let’s dive in to figure out how one can create a meeting type in Kronologic Platform. We would recommend reading through Meeting Types before to get familiar with the concepts we will be talking through.
Anatomy of Meeting Type Page
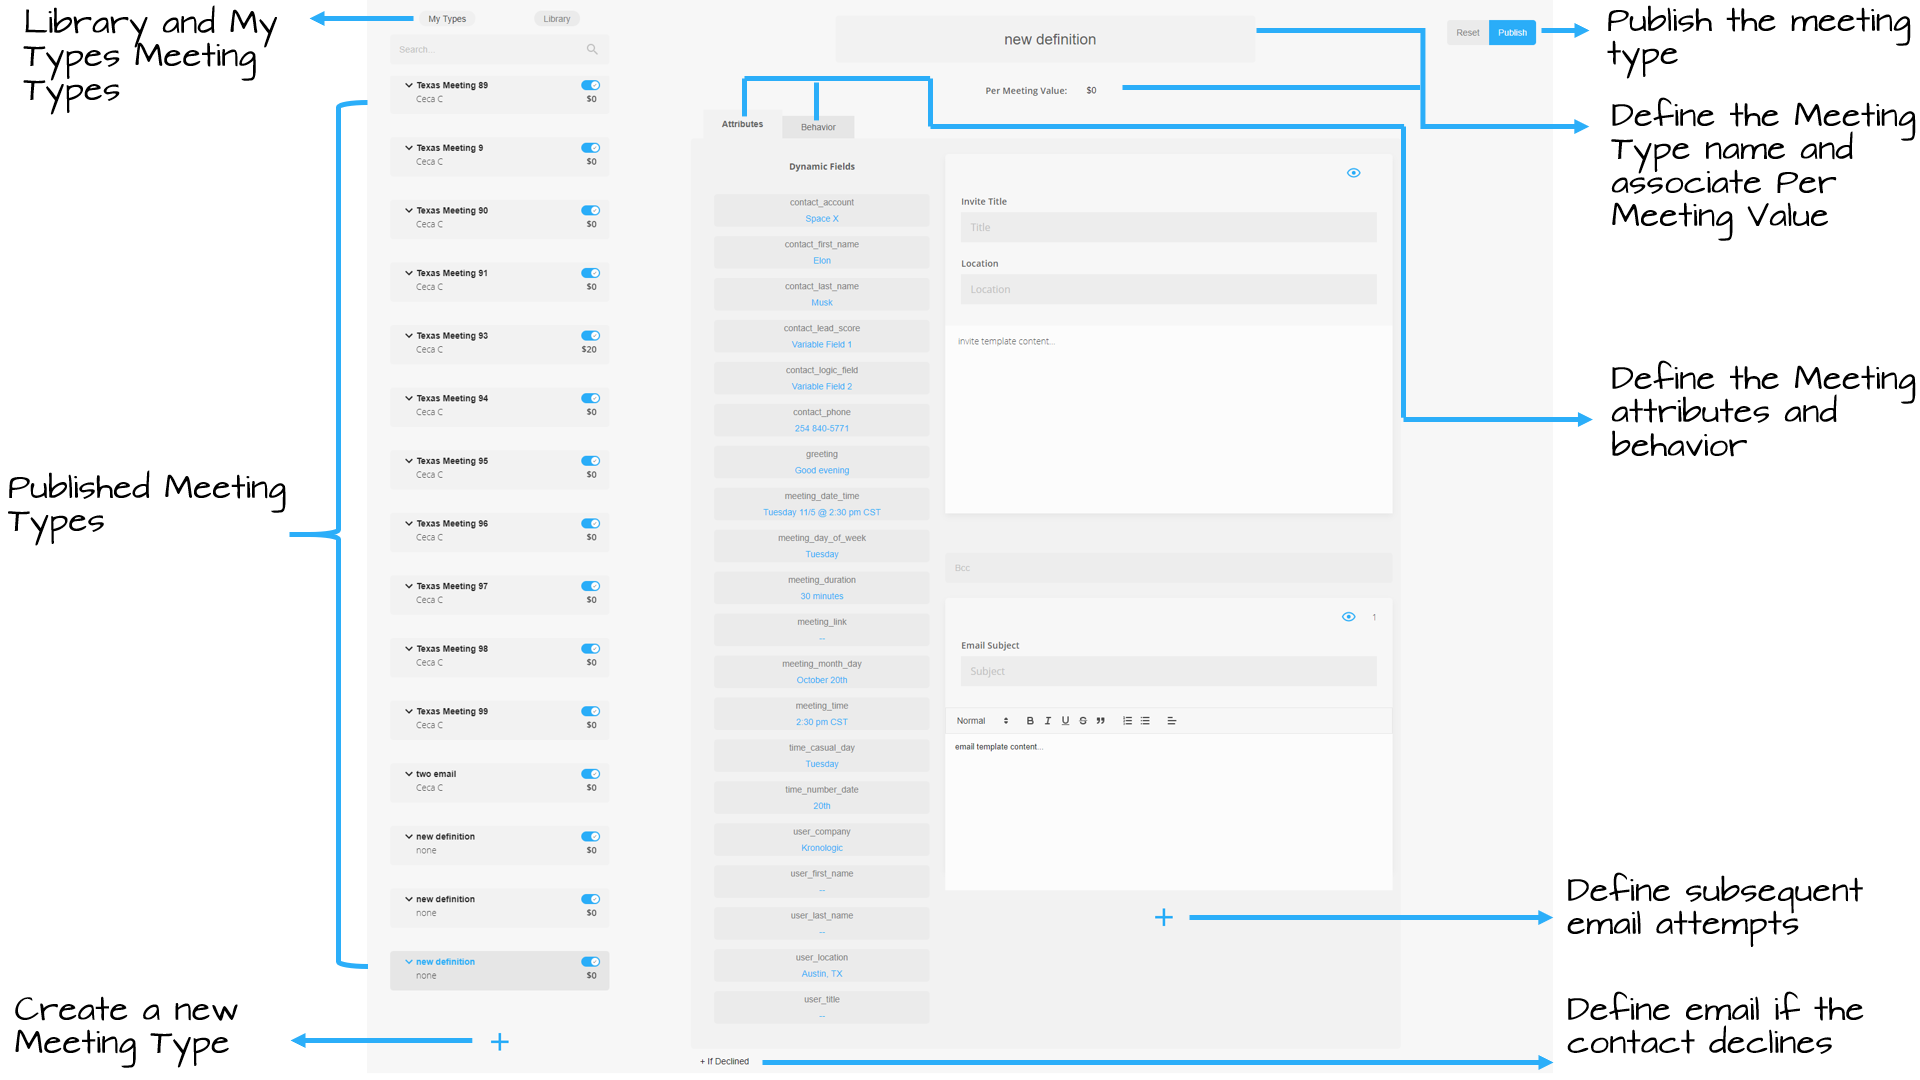
Admins can create a new meeting type under both the Library or My types of meeting types list.
The “+” sign under the “Library” and “My Types” panel once clicked, creates a blank template for a new meeting type.
When creating a new meeting type under the library, only the meeting attributes need to be defined and none of the fields are mandatory.
While for defining a new meeting type under My Types list, both Meeting Attributes and Meeting Behavior needs to be defined.
The meeting type creation process can be broken down into 3 simple steps
- Defining a Meeting Type Name and associating Per Meeting Value
- Defining Meeting Type Attributes
- Defining Meeting Type Behavior
Defining a Meeting Type Name and associating Per Meeting Value
The new template has “new definition” as the default name and the Per Meeting Value is set to $0 by default. “Per Meeting Value” associates monetary value to each type being created. Read more about calculating the per meeting value here.
Defining Meeting Type Attributes
Meeting type attributes are central to defining the meeting invite and email template(s). Admins can also codify a templatized response when an invitation is declined by the contact/lead but no other information is provided.
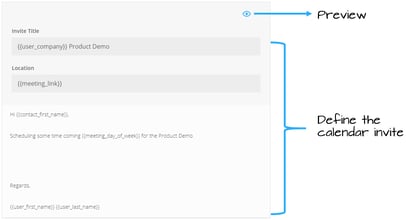
The dynamic fields within the attributes help personalize the meeting type for the recipients. An example of a calendar invite template is shown above which uses dynamic tokens.
For the calendar invite, admins can define
- Invitation Title
- Location for the meeting and
- Calendar description
The preview option lets admins see how the adjustments they’ve made will look when “real” values are put in place of the tokens. For example, clicking “Preview” will replace the token with an example first name. For the emails that will accompany the calendar invitation, admins need to define
- The email subject line
- The body of the email
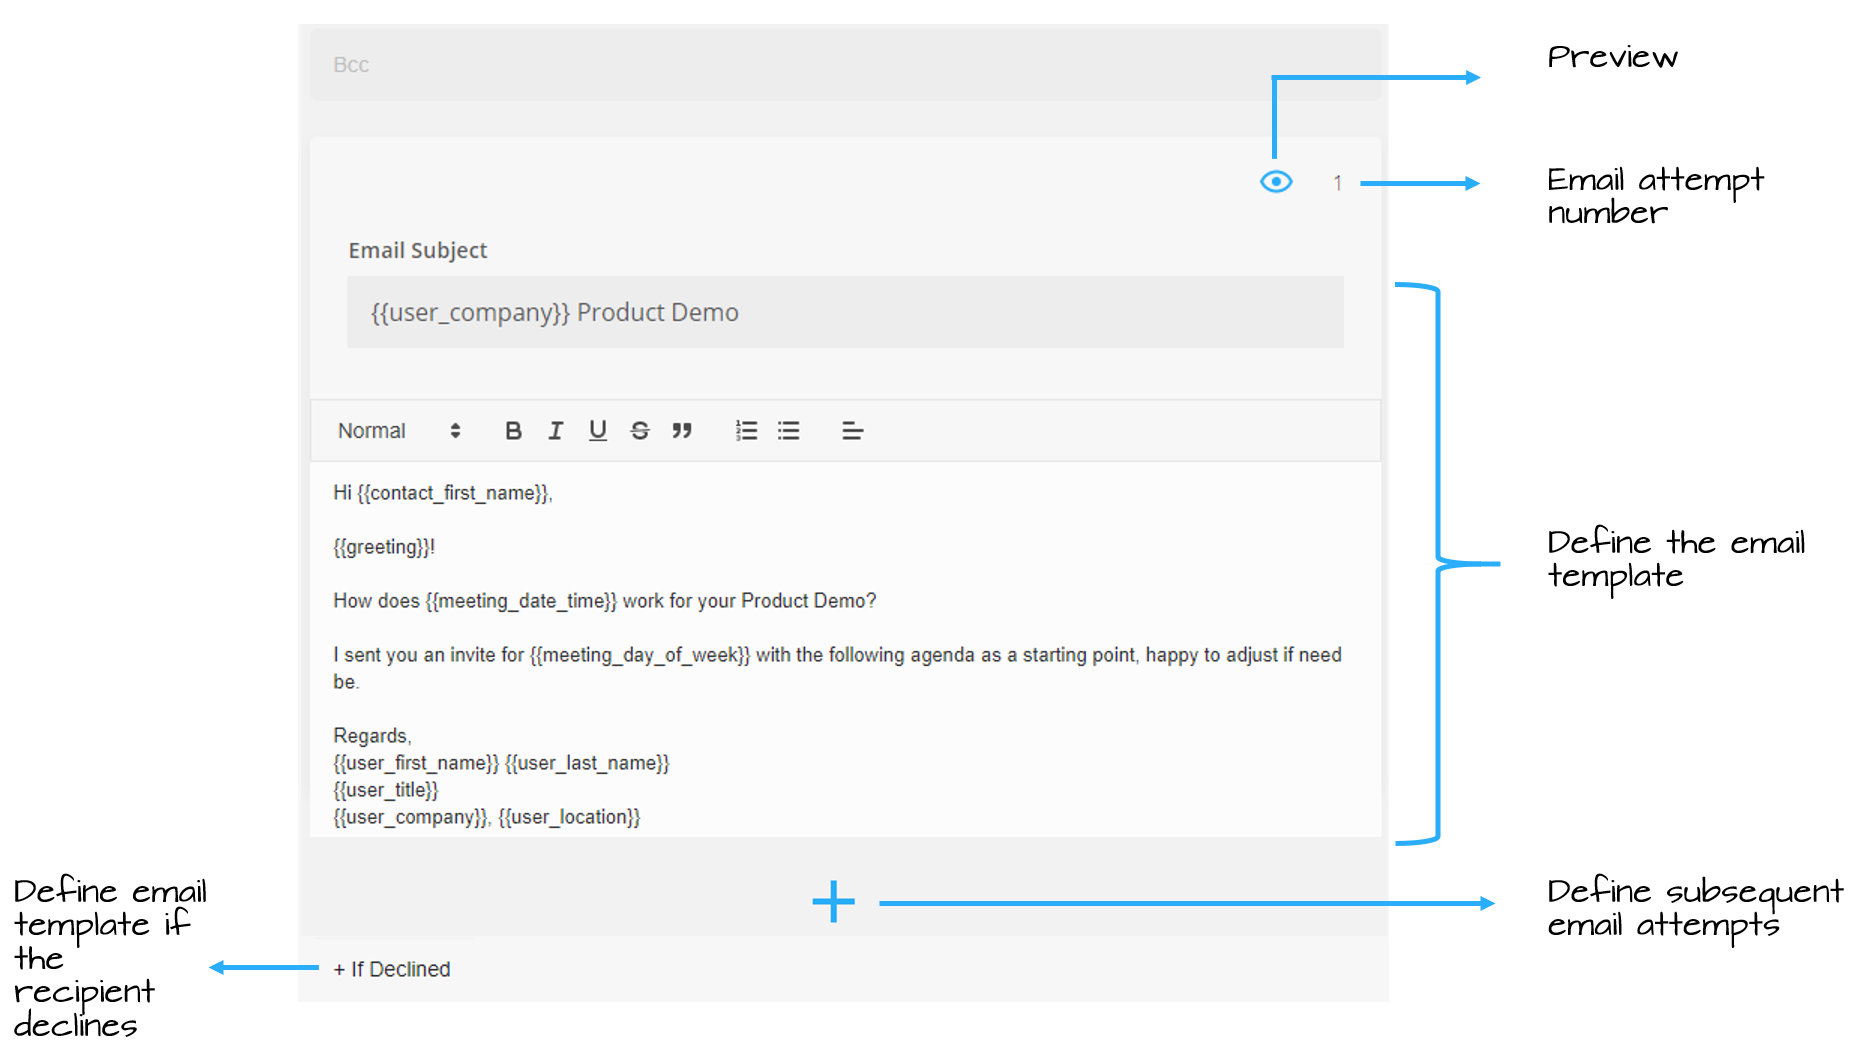
The “+” sign at the bottom, lets admins create additional email attempts in case the first attempt goes unanswered. The Preview option exists for email templates as well and the number of the email attempt is also shown beside the preview button. Each email attempt should have a different template but the calendar invitation template defined at the top, remains the same for all attempts.
Lastly, the “+ If Declined” option lets admins create an email template that would be sent should a prospect decline the invitation and provide no additional information other than simply clicking the “Decline” button on the calendar invitation.
If an admin is trying to create a new Meeting Type from the library, the admin can copy the Meeting Type template from the Library to My Types. The admin will then be able to configure the meeting behavior.
Defining Meeting Type Behavior
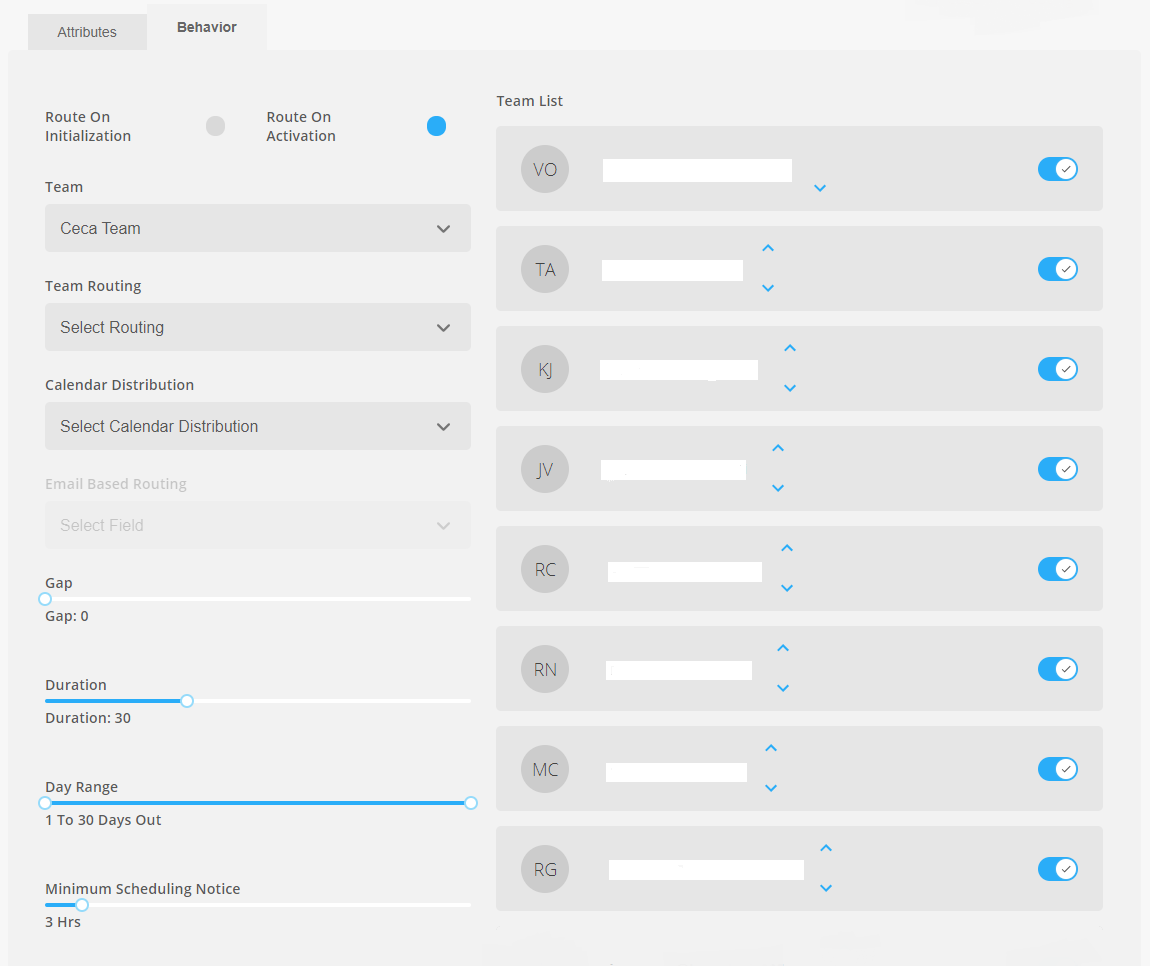
The behavior tab allows admins to configure the routing of leads within the selected team as well as the following meeting-related parameters.
Route on Initialization Vs Route on Activation :
The option selected here decides when the meeting instances will be routed to the team members. The routing can happen either when the instances are initialized or when the instances are initialized and activated.
Team :
Once the meeting attributes are defined, the correct team needs to be associated with that meeting type so that the team members get assigned to the meeting instances provisioned out of the meeting type.
Once a team is chosen, the members of the team are listed on the right as shown in the image above. The blue switch indicates active users. An inactive user is indicated by the inactive switch.
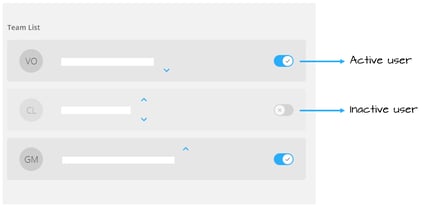
The up and down button against the team members allows setting the order of users in a team by moving them up or down in the list. This is useful when multiple users have logic that is true for a given instance, the top-to-bottom order of the users in the “behavior” tab dictates which user receives the instance.
Team Routing :
Kronologic offers Custom, Email based, Random and Sequential routing options to route meeting instances across team members.
Custom : Custom routing allows admin to set completely customized filters for each user.
An example might be when “State = Texas” route to User A and when “State = New York” route to User B. Please remember that this is explicit logic, therefore if there is no logic the system defaults to not routing the instance - this is done to minimize the risk of routing incorrectly and creating a poor buying experience for any prospects. If multiple users have logic that is true for a given instance, the top-to-bottom order of the users in the “behavior” tab dictates which user receives the instance.
Email based : Email based routing will route the meeting instance to the lead/contact object owner in Salesforce.
Random : A user is selected at random for a meeting instance associated with this meeting type for a particular lead/contact/opportunity contact
Sequential : Instances are distributed sequentially across a team.
Calendar Distribution :
Calendar distribution decides how the meeting instances will be loaded for a user in his/her calendar. The options available are Random, Random High Volume and Front Load. It is advisable to choose the distribution type that best suits the team and the leads.
Random : The meeting instances are distributed randomly over the selected day range.
Random High Volume : The meeting instances are distributed randomly and are stacked. This type of calendar distribution can stack up to 14 meetings at the same time slot.
In case of a double booking a user may have to move the meetings.
Note : This type of calendar distribution is helpful for Meeting Types with low acceptance rate or for cold leads that haven’t been contacted for over 3 months for example.
Front Load : The meeting time proposed will be the first availability of the user, beginning with the next day.
Gap :
Users can set the time gap they need between their consecutive meetings. For example, if “15 minutes” is selected, Kronologic will ensure that there is at least a 15 minute gap between the end time of a user’s last meeting and the beginning of the next one.
Duration :
This sets the duration of the meeting type being defined.
Day Range :
Day range lets admins to select a range within which all the meeting attempts for a contact will get scheduled. The default range provided is 1 To 30 days out in the future.
Minimum Scheduling Notice :
The minimum scheduling notice allows users to set a duration ahead of the proposed meeting time within which if the contact has not accepted the meeting invite, the calendar invitation is automatically withdrawn from both the user and contact’s calendar. This is useful for preventing last minute meetings from popping up on the calendar.
The default scheduling notice set within Kronologic is 3 hrs. Whatever number the admin sets in this field is set as the new minimum scheduling notice.
Once both the Meeting attributes and behavior is defined, the Meeting Type is all set to be published! Once it is published, the meeting type shows under My Types as an active meeting type and an option to set Channels against the meeting types is enabled. Channels allow users to provision meeting instances, intercept meeting instances or update the CRM with status of active instances.
Note that for a new meeting type to be published under My Types, below fields are mandatory fields within meeting attributes and meeting behavior.
- Distribution
- Team
- Email Subject in email 1
- Invite location
- Invite Title
- Routing
Quick Tip : If there is an already defined meeting type very similar to what needs to be created, there is an option to clone the existing meeting type to create an exact duplicate. The search makes it easier to find the existing meeting type from the list and the down arrow next to the meeting type name opens an option to clone the meeting type.
The cloned meeting type has the same name as the original but ends with “clone” by default, making it easier to differentiate from the original. Also, the Meeting attributes and behavior is replicated which can be modified later as needed.
Originally published Nov 2, 2020 2:56:22 PM, updated
Topics: Product, Meeting Type

Written by Snehal Jogdand
Snehal Jogdand is a dynamic business professional with 7 years of diverse industry experience. She is passionate about developing innovative solutions that combine cutting-edge technology with a deep understanding of customer needs. With an extensive background in both customer driven roles such as sales, marketing, market research as well as technology driven roles such as business analyst, product owner and scrum-master, she upholds tech-driven approach to problem solving.